Beaded Cuffs Tutorial

How to get your Beads onto the Yarn:
(you can click on any of these pictures to make them bigger!)


Making a Yarn Over with a Bead:

Working into Yarn Over's with Beads: (WS rows)

When working back on purl rows you want your bead to be to the BACK of the left hand needle, i.e. on the left leg of the yarn over, when working into it.
Knitting a Stitch with 1 Bead: 

pic 1 pic 2
Pic 1: Put your right ndl into the next stitch on your left needle to work as usual, then slide a bead up until it is touching the right hand needle.
Pic 2: Then work the stitch, pulling the bead through, the bead will lock into place on the new stitch you just made!
Working Beaded Attached I-Cord: (please see the pattern for complete step-by-step instructions, these photos are meant to help you with the more tricky parts)

pic 1 pic 2
Pic 1: Shows stitch being picked up along edge of cuff.Pic 2: Shows all stitches being slid to other end of needle to begin next row.

When working into an i-cord stitch with bead on it make sure that the bead is to the BACK of the left hand needle.
Working Beaded Clasp:


String 3 beads onto yarn with a small sewing needle or a dental floss threader, leaving a 3 inch tail go back through the beads in the same direction again creating a loop.


String on 3 more beads and go back through the first 3 beads again.
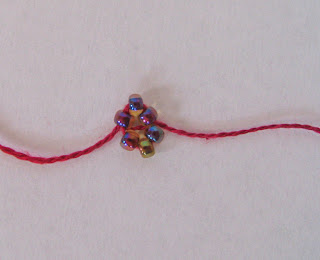
You will have a circle of 6 beads with a length of yarn running through the middle of it. Attach this to the opposite end of the bracelet in line with the first loop. Sew it down only on that center thread. This is important so that the loop can go all the way around the “button” and catch itself. If you sew it down on the edges the loop won’t have any grip and your bracelet will fall off!

what a beautiful tutorial!
ReplyDeleteyou are amazing. this is ridiculously small. these are so beautiful.
ReplyDeleteThis is very interesting because you can make this with your friends, create fascinating designs, even just jam all the beads on the bracelet, and it is good to go!!
ReplyDeleteI know this if off topic but I'm looking into starting my own blog and was curious what all is needed to get set up? I'm assuming
ReplyDeletehaving a blog like yours would cost a pretty penny?
I'm not very internet savvy so I'm not 100% certain. Any recommendations or advice would
be greatly appreciated. Thanks
Here is my web page - vehicle branding gauteng
you're in point of fact a good webmaster. The site loading speed is amazing. It seems that you're doing any unique trick.
ReplyDeleteFurthermore, The contents are masterwork. you've done a fantastic process on this matter!
Also visit my site; faro software
It's an remarkable article in favor of all the online users; they will obtain benefit from it I am sure.
ReplyDeleteStop by my blog post visit this site
Excellent blog you have here but I was wondering if you knew
ReplyDeleteof any discussion boards that cover the same topics discussed in this article?
I'd really love to be a part of online community where I can get suggestions from other knowledgeable people that share the same interest. If you have any suggestions, please let me know. Thank you!
Check out my homepage ... visit this site
Lovve Your Designs,....But I Crochet WAAAAAAAA!!!!
ReplyDeleteWorking on one of these bracelets and having a hard time with the beaded I Cord.. In the directions, it says to cast on two stitches then pick up but not knit the third, then slide to the right. However, looking at your picture above, it appears your working thread is attached to the third thread as it would be in a normal I cord. ?????
ReplyDelete